Indoor waterproofing is one of the most important hidden works in building repair and renovation. In kitchens, bathrooms, balconies, swimming pools and interior wall-and-floor junctions, even a small failure in the waterproofing layer can lead to damp walls, tile debonding, peeling finishes, mold marks and recurring leakage.
Why indoor wall and floor waterproofing fails
Water leakage in indoor wet areas is rarely caused by one single point. Common causes include hollow or cracked finishes, weak mortar layers, loose tiles, dusty substrates, untreated corners, poor wall-floor junctions, and waterproofing applied directly over unstable surfaces.
If a new waterproofing layer is applied over a loose or deteriorated finish, the system may fail together with the old layer underneath. That is why surface removal and substrate preparation are not optional steps; they are the foundation of the entire repair system.
Where this solution can be used
This indoor wall and floor waterproofing solution is suitable for wet-area repair and refurbishment, including kitchens, bathrooms, interior wall areas, balconies, swimming pools and similar moisture-prone spaces.
It is especially suitable when the existing surface shows hollowing, cracking, aging, tile looseness or deteriorated finishing layers. For special water-retaining structures, long-term immersion areas or negative-side water pressure, the project condition should be checked before selecting the final system.
System materials: CKS Primer + CKS SpiderWeb 200X
CKS Primer is used after surface cleaning to strengthen and seal the substrate. It is ready to use and can be applied by roller or brush. This step helps improve surface consistency before the waterproofing layer is installed.
CKS SpiderWeb 200X is a fiber-reinforced waterproof compound designed for building wall and floor waterproofing. SpiderWeb 200X contains anti-crack fiber and is suitable for interior walls, exterior walls, indoor kitchens, bathrooms, balconies, floors, fire pools, landscape pools, canals and dams. Its fiber-reinforced formulation helps improve coating cohesion, adhesion and resistance to cracking.
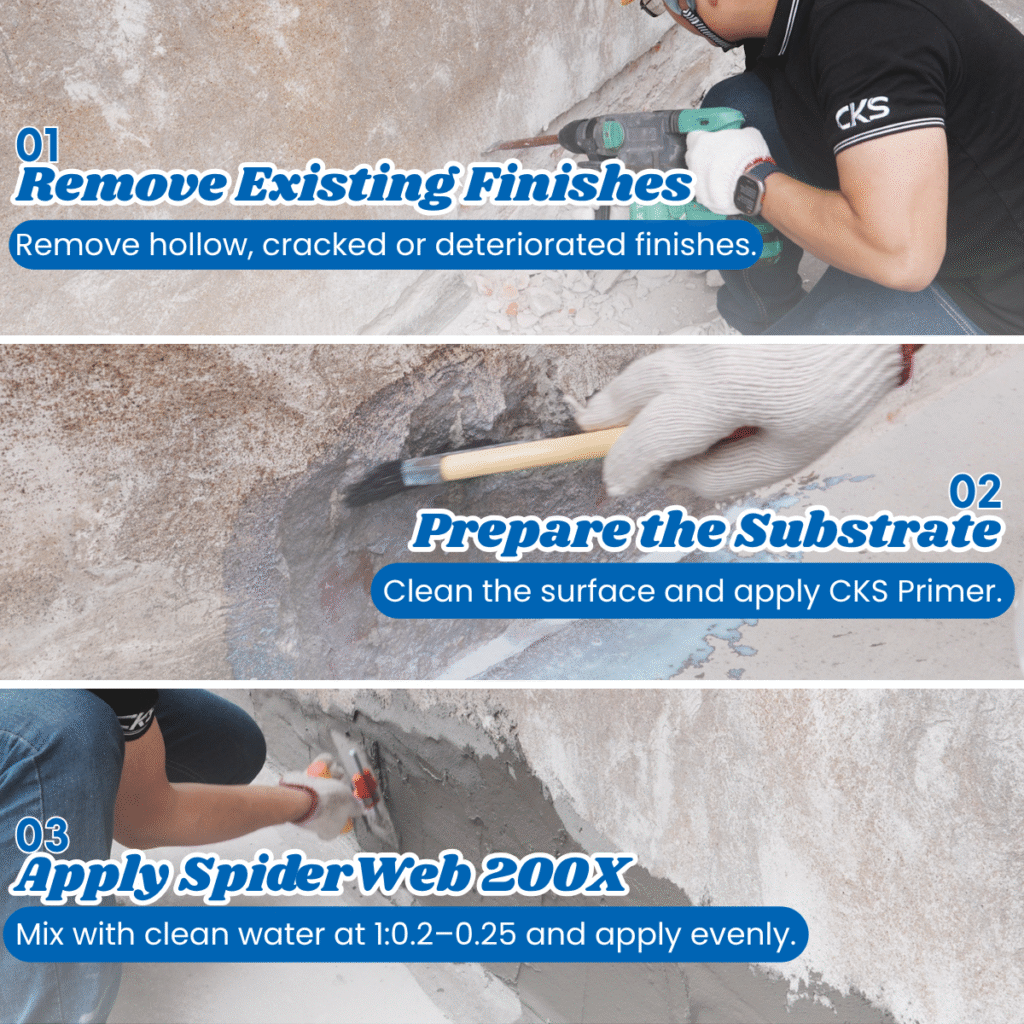
The construction steps are as follows:
Step 1: Remove hollow, cracked or deteriorated finishes
Start by removing the unstable finish layer. Use a scraper, chisel, impact drill or suitable site tool to remove hollow, cracked, loose or aging surfaces until the original concrete, masonry or structural substrate is exposed.
This step is important because waterproofing must be built on a sound base. Do not keep loose tiles, powdery mortar, damaged screed or peeling layers under the new waterproofing system. Any weak layer left behind may reduce bonding and increase the risk of future leakage.
Step 2: Clean and reinforce the substrate with CKS Primer
After demolition and surface removal, clean the substrate thoroughly. Remove dust, loose particles, oil, laitance, standing water and construction debris. The surface should be firm, clean and ready to receive a primer layer.
Apply CKS Primer evenly by roller or brush. As a ready-to-use base treatment material, it supports substrate sealing and reinforcement before waterproofing. Allow the primed surface to dry as required by site conditions before applying SpiderWeb 200X.
Step 3: Mix and apply CKS SpiderWeb 200X
Mix CKS SpiderWeb 200X with clean water according to the recommended video application ratio: powder to water = 1:0.20 to 0.25. Use an electric mixer to blend the material until the mixture is even and workable. Avoid adding excessive water, as this may affect build-up, bonding and waterproofing performance.
Apply the mixed material by steel trowel. The recommended single-layer thickness is 2-3 mm, with a coverage rate of approximately 1.5-2.0 kg/m². Apply in 1-3 coats depending on the project requirement and substrate condition. Keep an interval of 4-8 hours between coats, or until the previous layer is sufficiently dry for the next application.
Key construction reminders
- Remove weak finishes completely before waterproofing. A new waterproofing layer should not depend on an unstable old surface.
- Keep the substrate clean and firm. Dust, oil, loose particles and standing water can affect bonding.
- Do not over-dilute SpiderWeb 200X. Follow the powder-to-water ratio of 1:0.20-0.25.
- Control the layer thickness. Apply evenly and avoid leaving thin spots or heavy build-up in one coat.
- Respect drying and curing time. Allow 4-8 hours between coats and 48-72 hours before tiling when required.
- Reinforce critical details. Corners, drains, pipe openings, wall-floor junctions and transitions are common leakage risk points.
Why choose the CKS indoor wall and floor waterproofing system?
This system is designed for repair and refurbishment work where the existing finish has failed and a stronger waterproofing layer is required before new finishing work. The process combines substrate removal, primer treatment and fiber-reinforced waterproofing to help create a more reliable base for kitchens, bathrooms, balconies, swimming pools and other wet areas.
For homeowners, it provides a clear repair path instead of repeated patching. For contractors and applicators, it offers a practical sequence that can be followed on site. For dealers and sales teams, it gives a simple solution story: remove the weak layer, strengthen the base, apply fiber-reinforced waterproofing, then proceed with finishing after proper curing.
Planning an indoor wall or floor waterproofing repair? Contact CKS to choose the right waterproofing system for your kitchen, bathroom, balcony, swimming pool or wet-area renovation project.